|
DRESSMAKING
----
EASY-TO-MAKE
'A'-LINE SKIRT
|
TUTORIAL
The design is given for a 2-panel
skirt with a 33" 84cm
waist, a 24" 61cm length
and a 96" 244cm hem.
to change the measurements.
.
With the layout shown below you will require
material at least 55" 139cm
wide and 52" 132cm long.
Please make sure your material is big enough; if it isn't, you will
have to either:
1) Buy wider material
2) Buy more of the same material and cut some of the panels
from the new piece
3) Work out a different layout that fits the material you have
.
|
DISCLAIMER
Whilst every attempt has been
made to ensure that the information on this site is
accurate, no responsibility can be accepted for errors. You
follow these instructions at your own
risk.
|
Return to introduction page
MADE FROM:
A piece of suitable cotton material at least 55" 139cm
wide and at least 52" 132cm
long. Denim is the easiest to work with and also gives the skirt a
pleasant casual appearance.
Stretch material is not recommended as it is difficult to work
with and may not last as long as plain cotton fabric.
Sewing thread of a colour which matched the material or
compliments it. (A contrasting colour is easier to unpick when you
make a serious mistake, but shows up badly if you only make a minor
mistake and hope to get away with it.)
A zip fastener. A straight type about
7" 180cm
long, in a colour which matches the material or is slightly lighter,
so that it will match after the material has faded a bit.
Petersham, about 1.25"
32mm wide and at least 35" 88.9cm
long for waistband stiffening.
A Button to suit the style and colour of the skirt
YOU WILL ALSO
NEED:
|
Sharp scissors with at least
5" 12cm
long blades
Ruler or straight-edge about
40"
100cm long
Dressmaker's tape measure which must have an eyelet or
hole at the end nearest the '0' mark.
Tailor's chalk for marking out
A ball-point pen
A large darning needle
A medium sewing needle
A stitch 'ripper' or unpicking tool, or a sharp knife
Dressmaking pins or a stapler.
A flat surface to work on - a firm, flat bed will
suffice, provided a wooden board is placed under the
material when cutting out, so as to avoid cutting the bed
sheets by mistake. The wooden board should have accurately
square corners to assist with marking out, and smooth edges
to avoid snagging the material.
An electric sewing machine which can do zig-zag stitching
On old CD, if you are making patch pockets.
|

|
|
Right and Wrong Sides: Most types of material have
one side which is intended to be seen, which is called the
"Right Side" and is supposed to finish up on the outside of
the garment. The other side is called the "Wrong Side".
Some materials look equally good from either side; others
look very similar from either side, but it is still
important not to mix up the two sides or the garment will
look patchy.
In the case of denim, it is very obvious that the Right
side is much darker than the Wrong side and mistakes are
unlikely. For less obvious material, it is best to decide at
the outset which side will be the Wrong side and mark it all
over with "W"s in tailor's chalk.
|
THE GENERAL
LAYOUT
This shows how the pieces are laid out so as to give the
least waste of material. Because the material is folded in half and
the two halves cut out together, two pieces will be created for every
one shown in the drawing below. It does not matter at this stage
whether you fold the material so the Right sides face each other or
the Wrong sides face each other.

|
Selve edge: When each piece of cloth is being
made, it is held in the weaving machinery by the "Selve
Edges" , which are left rough and unsighly and should not be
included in the final garment. When folding the material in
half lengthways, the selve edges will come together as shown
above. The hem of the skirt panel will be marked out so as
to be clear of the selve edge.
|
Make sure you have folded the material so that the fold runs along
the length of the cloth and the selve edges come together.
MARKING AND CUTTING THE
SKIRT PANELS

|
Using the wooden board as a guide to mark out three lines
'A', 'B', and 'C' accurately at right angles to the fold
edge. The top edge of the board is aligned with the folded
edge of the material and tailor's chalk is used to mark the
material using the L.H. edge of the board as a straight
edge.
Line 'A' is positioned about
1"
2.5cm from the L.H. cut-off
edge of the material, line 'C' is spaced 22" 56cm
from 'A' and line 'B' is spaced a further 22" 56cm
from 'C'.
|

|
|
|
A to C = 22" 56cm
|
C to B = 22" 56cm
|
|
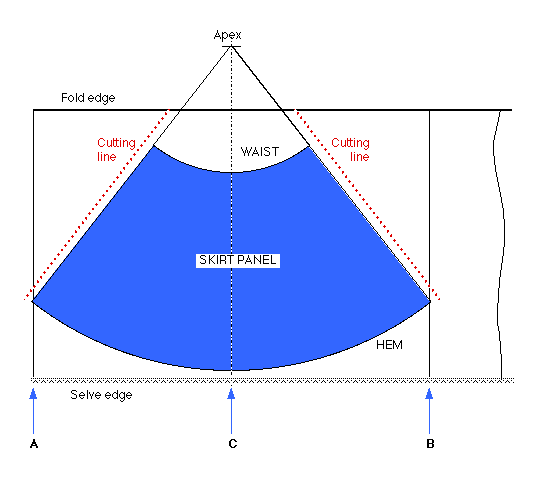
Line 'C'is the centre line of the skirt panel. When marking
out the cones which will form the panels, the apex of the cones must
be in line with the centre line.
Remove the board and carefully smooth out the material between
lines 'A' and 'B', taking particular care that the selve edges align
accurately with each other. Lay the tape measure along line 'C' with
the '0' end in the approximate position of the apex, pulling it
tight. Adjust it until the 36" 91cm
mark is
1/2"1cm
inside the selve edge and the centre line of the tape is exactly
above line 'C'. Then pin the eyelet at the '0' end of the tape to the
bed mattress with a large darning needle to fix the true position of
the apex.
(If you find that the dimensions you need to mark are longer than
your tape measure, transfer the measurments to a long piece of string
by means of knots or felt pen marks and use the string instead of the
tape measure to mark out the arcs shown below)

|
Tilting the needle away from the direction of pull will
help to prevent the tape from slippping off. The tape can
now be pivoted around the apex pin to mark out arcs on the
material.
|
From now until the skirt panel has been completely marked out, is
is important that the material is not moved.
|

|
With the tailor's chalk, mark out the position of the
36" 91cm
measurement where it intercepts line 'A' and line 'B'
Swing the tape through an arc between line 'A' and 'B',
marking the position of the 36" 91cm
measurement at several places; then join up the marks to
give a smooth curve. This will be the hem line.
|

|

|
Using the straight edge or ruler, draw diagonal lines
from the apex to the two points where the arc intercepts
lines 'A' and 'B'..
|

|
Draw another arc between the two diagonal lines, this
time using the 12" 30cm
mark on the tape measure. This will be the waist line.
|

Now mark two additional diagonal lines
3/4"
2cmoutside the two existing diagonal
lines. These are shown in the drawing below as "cutting line". This
allows some extra material for the seams when the panels are joined
together.

Slip the wooden board between the material and the
bed. Ensure the selve edges are still in alignment and then carefully
cut along each cutting line, making sure the two layers of material
are cut 'as one' (If necessary, they can be pinned together before
starting the cut, but make sure the pins will not be in the way of
the scissors.) Reposition the board when necessary, so as to keep it
underneath the cutting point.

|
Cut along the hem line, gently lifting the material away
from the cut so as to allow the scissors to follow a smooth
curving path.
In a similar way, cut along the waist line.
|
This will have created two identical skirt panels. Leave the
centre line 'C' chalk mark on the panel as it may be needed later

Carefully lift the skirt panels away, leaving the remaining
material folded along the centre line.
MARKING AND CUTTING THE POCKET
MATERIAL
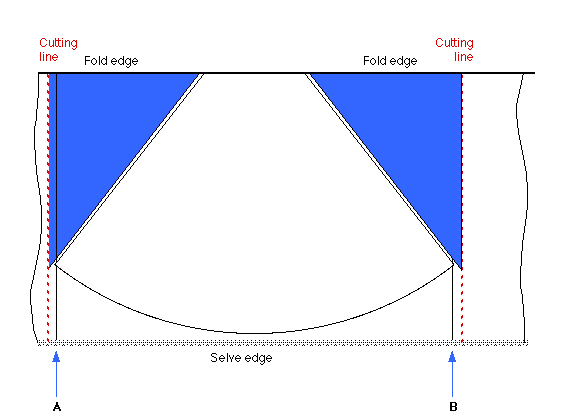
As shown in the drawing below, mark a line to the left of line 'A'
and another to the right of line 'B', just far enough away to give a
straight uninterrupted line right across the material. Cut along
these lines. Cut out the triangles shown in blue below.


|
Put these triangles aside, keeping them folded as they
are; they will be needed when you come to make the pockets.
|
MARKING AND CUTTING THE
WAISTBAND MATERIAL
Retrieve the spare material and ensure that it is folded with
the selve edges together as previously. Locate the edge which was the
cutting line adjacent to line 'B' and mark a new cutting line
parallel to this edge and
4.5"11.5cmaway
from it.

Lay the material over the wooden board and check the alignment and
flatness of the two thicknesses, then cut along the new cutting line
to make the waistband.

Take the petersham and measure-off the
waistband length,33" 84cm
. Mark the length with a felt pen. As a further check before cutting,
wrap the petersham around your waist and make sure that length feels
comfortable.
Add another 2"
50mm to the length to allow for a flap
which will later be joined by a button or hook, draw a second line
across the petersham and cut it on this line.

Fold the waist length of the petersham in half (ignoring the added
length) and mark the middle line with a felt pen across both sides.

THIS COMPLETES THE CUTTING OUT.
|
At this point you need to make a decision:
Do you want large scalloped pockets or smaller patch
pockets?
(The large scalloped pockets are more difficult to make
but they are more practical and allow you to carry bulkier
items without spoiling the appearance of the
garment)
|


